Creating the Trigger and the Luteal Phase Calendar is the next step when a practitioner determines a patient is ready for their Trigger shot. This opens up the "gateway" for the laboratory to have access to the patient's cycle sheet for their lab notes.
Navigation

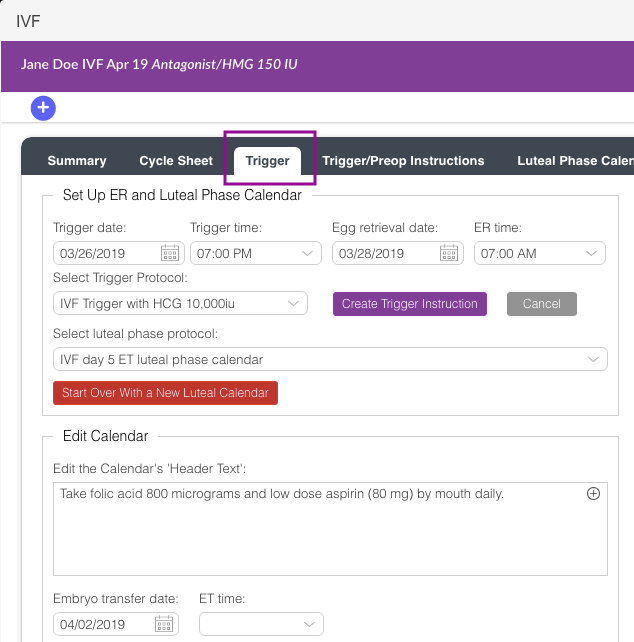
Go to the Cycle Sheet and select the Trigger tab.
Creating the Trigger

The trigger and luteal phase information will be filled out on this page.

1. Enter the Trigger date and time.
2. Enter the Egg retrieval date and time.
3. Click on the drop-down menu to choose a Trigger protocol from your Trigger Protocol Library.
4. Click on Create Trigger Instruction.

A pop-up will appear to tell you the Trigger instructions have been added. Click OK.

1. Select the luteal phase protocol by clicking on the arrow to provide a drop-down list and select the desired protocol from the Luteal Phase Protocol Library..
2. Click Create Luteal Calendar.
3. The ET transfer date and ET time can be added to this screen if known at this point.

In an IVF cycle the Luteal Phase starts on the day of the Egg Retrieval.
The Luteal Phase Calendar can be edited by clicking on the Edit Calendar on a Daily Basis tab, if necessary. Click here to learn more.
How Will the Patient See Their Instructions

Go to the Trigger/Pre-op Instructions tab.
1. Instructions may be edited if necessary. Enter the text inside the appropriate dialog box that you wish to edit or add more information.
2. Calendar Wizard generates an instruction sheet that details the patient’s Trigger injection date and time and mixing/administration instructions, egg retrieval date and time, and preoperative instructions.
3. Once all changes have been made, click on the printer button to provide instructions to the patient.

This is how the patient will see the Trigger/Pre-op instructions. This tool allows you to send the instructions directly to the patient via the smart phone app or patient portal by clicking Send E-mail. If necessary, the instructions may also be printed for the patient by selecting Print then hit close.

Click on Luteal Phase Calendar. This is the List View. Patient's can toggle back and forth between the List View or the Grid View, depending on their preference.

This is the Grid View.
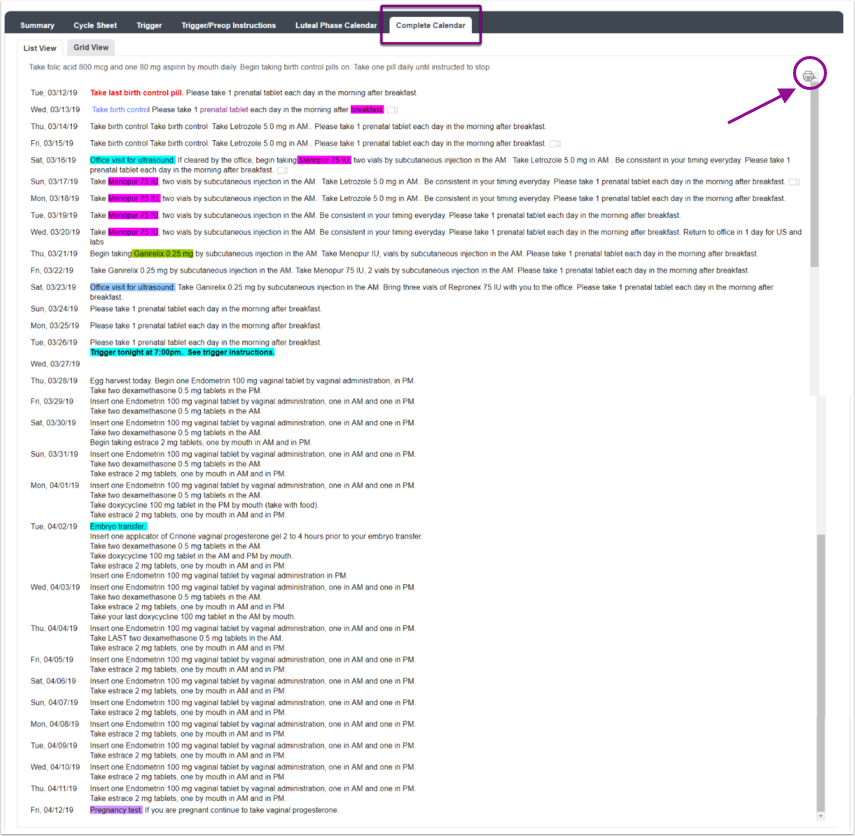
Once a patient has been triggered and the luteal phase calendar has been created, a patient can view the entire cycle. Clicking on Complete Calendar will provide a view of the complete cycle from day one of the stimulation phases to the pregnancy test. The Complete Calendar can be viewed in List View or Grid View. Click the printer icon to send it to the patient's portal or to print out a hard copy.
Cycles With No Transfers
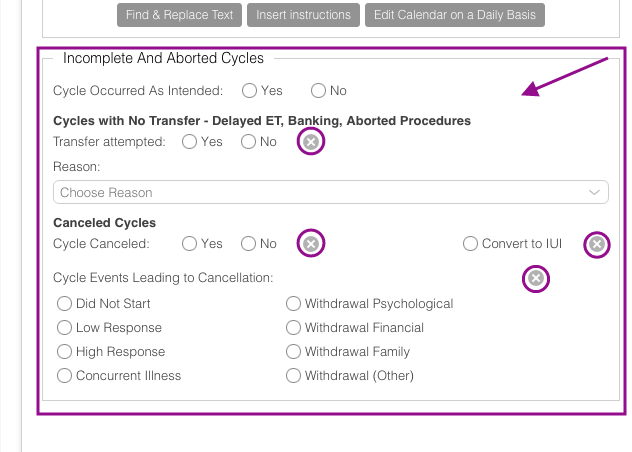
In cycles where no transfer occurs, be sure to mark Transfer Attempted as No. In the case of a planned freeze all, you would mark Cycle Occurred As Intended, as there was no plan for a transfer. If the cycle has been cancelled, mark Cancelled Cycles as Yes and select the reason behind the cancellation. In instances that you have selected the wrong option, click the x icon to start over again. This is a SART field.
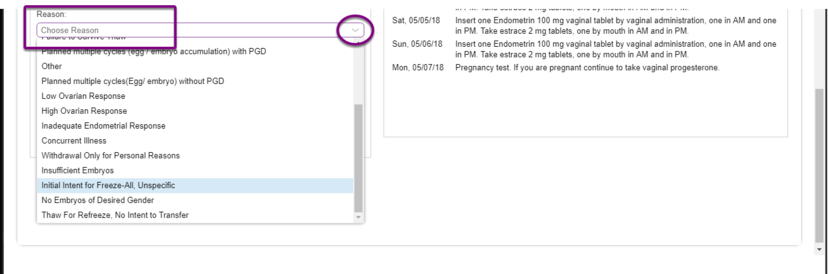
Choose the reason for no transfer from the drop-down list.
Automatically Updates the ER Schedule

Entering the Egg Retrieval Date and Time automatically updates the Surgical Grid and ER Schedule.

Updated ER/ET Grid showing the patient now on the schedule for her egg retrieval.
Indicating the Start of Progesterone in an FET cycle
Creating the Luteal Phase Calendar is also necessary in an FET cycle when a practitioner determines a patient is ready to start their progesterone. This opens up the "gateway" for the laboratory to have access to the patient's cycle sheet for their Lab Notes.
Navigation

The FET Luteal Phase Calendar will be set up in the Trigger tab on the Cycle Sheet.

1. Enter the Begin progesterone date.
2. Select Luteal phase protocol from the pull-down menu.
3. Click Create Luteal Calendar.
4. You may Edit Calendar's Header Text, if desired.
5. Enter the Embryo transfer date and ET time.

The FET Luteal Phase calendar is immediately available on the patient's smartphone app or her Patient Portal when you click on the printer button and select to either E-mail or print the instructions.
Patient's can toggle back and forth between the List View or the Grid View, depending on their preference.

List view of the Luteal Phase Calendar.

Grid view of the Luteal Phase Calendar.
**All manuals are compliant with HIPPA regulations. No patient information has been released. All screenshots above were taken from a test clinic with fake patient information.
Artisan Support
Comments