Document Scanning in Artisan keeps all hard copies of old reports and labs securely accessible from the cloud.
Using Document Scanning
There are two interfaces for document scanning :
1. On the Administrative Staff's Patient Info page
2. In the Administration Quick Tools menu.
From Within the Patient Chart

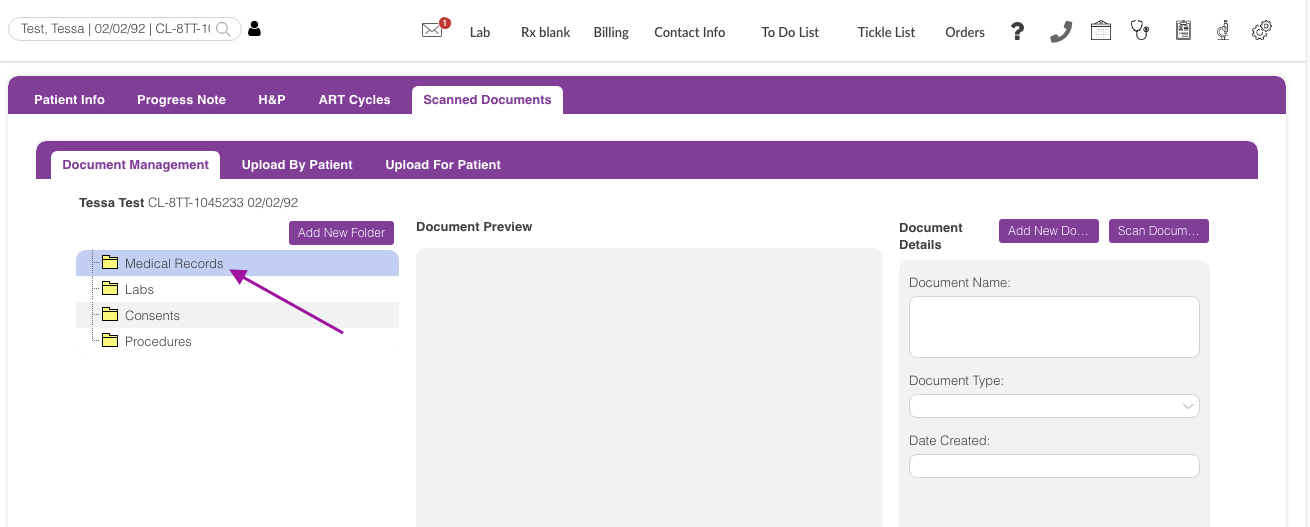
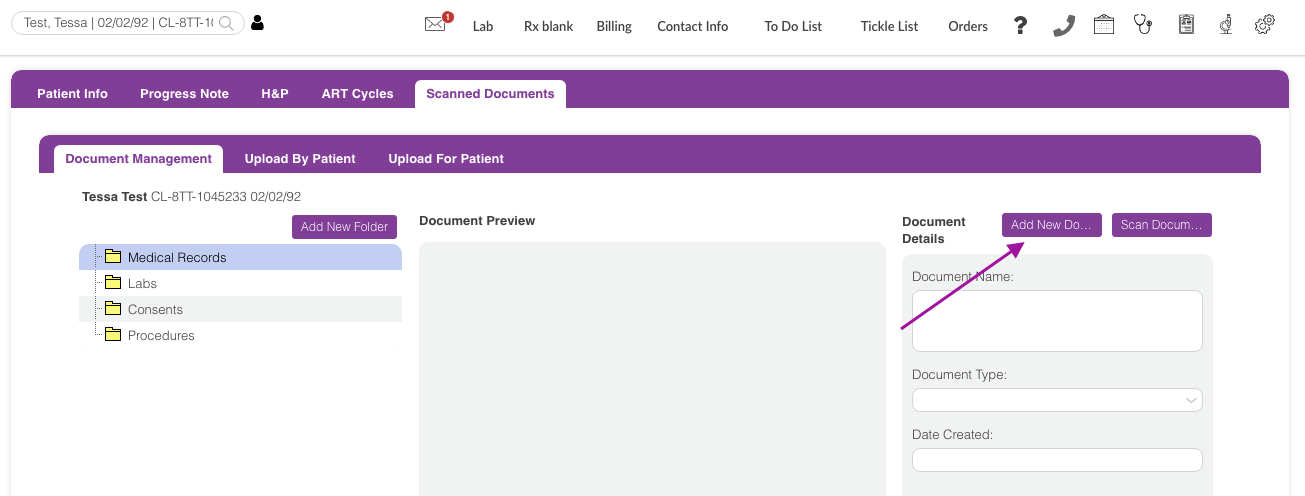
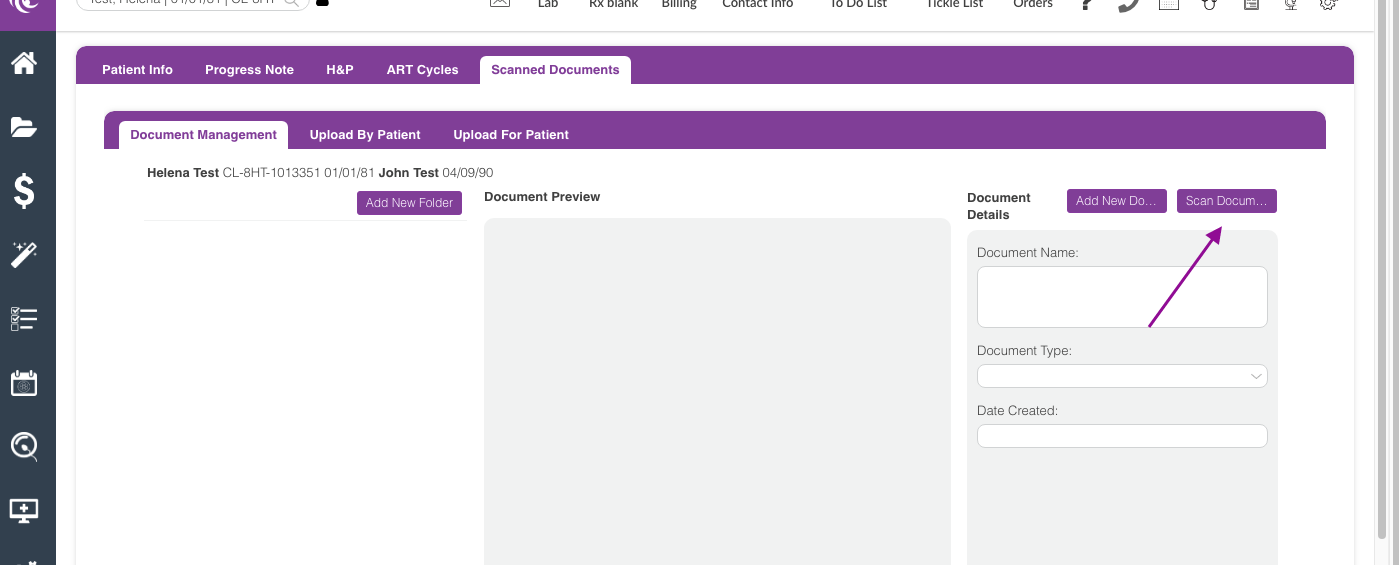
From the Document Management tab, there are two options to add scanned documents into Artisan.
1. Add New Document. Use this button to upload a document from your computer. This is a good option for items scanned previously or received through email.
2. Scan Document. Use this button to scan documents directly from a TWAIN compatible scanner into Artisan. This is a good option for hard copies you and in your office that you want to add into Artisan.
Add new folder allows you to create multiple folders to organize all uploaded documents. Click the add new folder button.
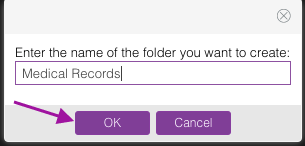
Enter the name of the folder that you wish to create then click the OK button. In the above example, we entered Medical Records.
You can create multiple folders as needed.
Click on the folder's name that you wish to edit or delete the folder.
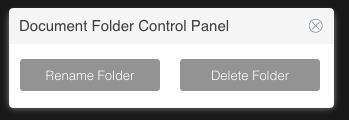
Click the Rename Folder button to edit the folder and click the Delete Folder button if you wish to delete the folder.
Upload a Document From Your Computer
Click Add New Document to open the Add Document window.
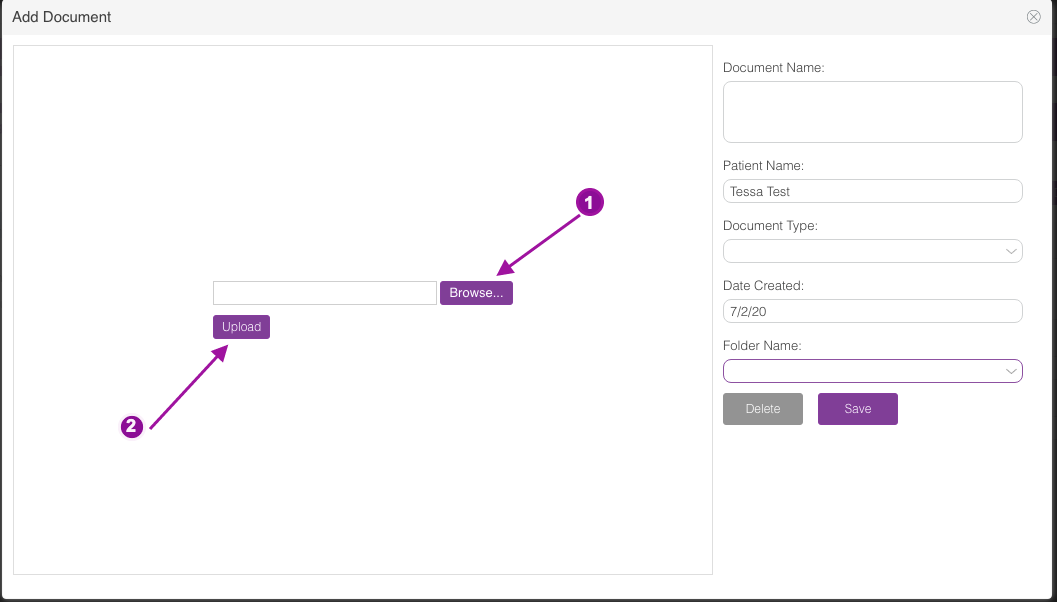
Click the Browse button and select the document that you wish to upload. Once you have a file selected, click Upload.
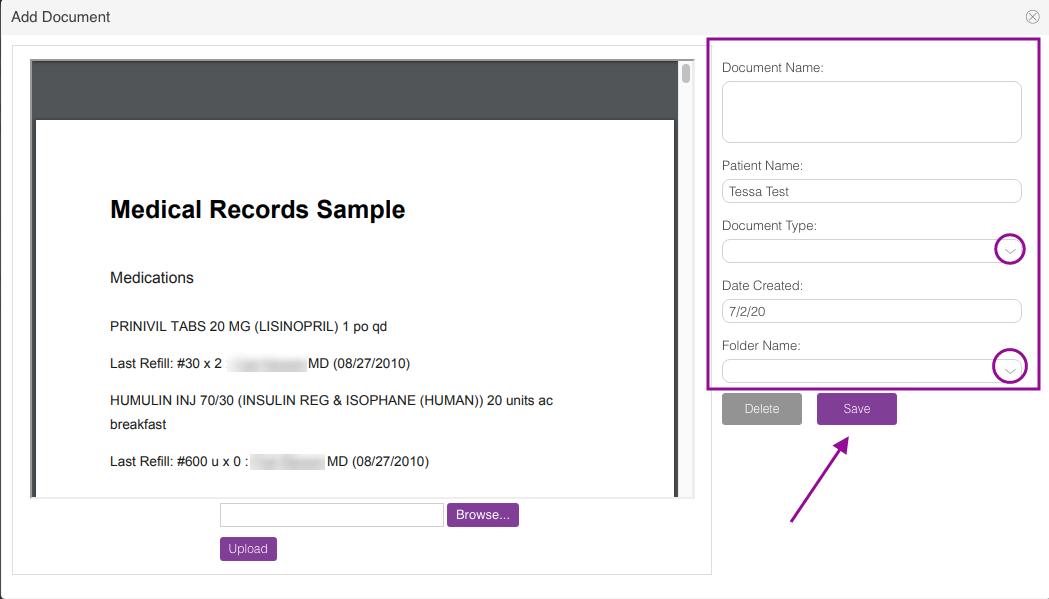
Your document will be displayed in the viewer. Fill in all of the document information on the right.
Document Name: Use this field to label your document. This name is very important as it will be the main method of identifying what the document is.
Patient Name: The patient's name will auto-populate.
Document Type: Select the category of the document. You are able to choose from Lab, Imaging, Records, Financials, and Consents.
Date Created: Today's date will auto-populate.
Folder Name: Click the drop-down icon to select the folder name.
Once you finish adding the document information, click Save.
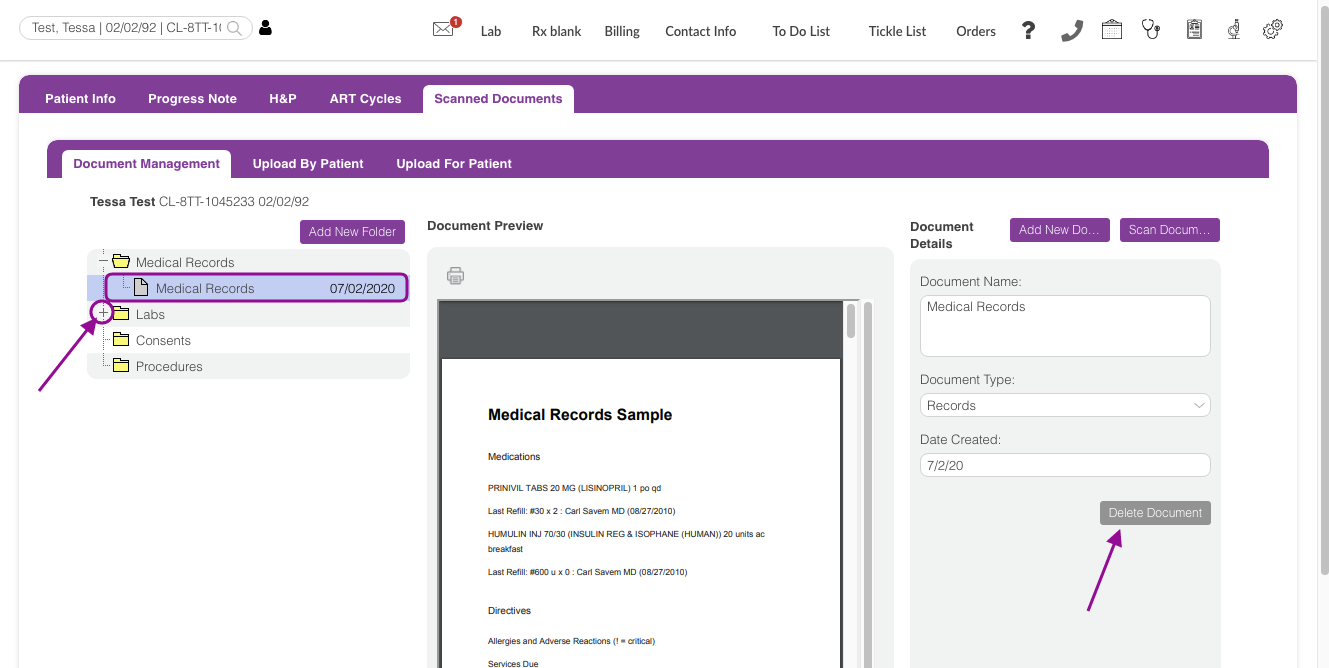
You can now see the uploaded document in the Medical Records Folder. To view documents inside the created folders click the plus sign icon before the folder's name to collapse the folder and view all documents that have been uploaded.
To delete a document, click the Delete Document button. You have 48 hours to delete an uploaded document.
You are also able to drag and drop the scanned document from one folder to another.
Scan a Document Directly From Your Scanner
Scanning directly from a scanner has a few prerequisites. Your scanner must be TWAIN compatible. If your scanner is TWAIN compatible, it may still need additional drivers to function properly with Artisan. If you are not sure if your scanner is TWAIN compatible or need help installing the necessary drivers, contact Artisan support.
TWAIN scanning is only supported on Windows and Mac computers.
Setup TWAIN Scanning
Before you scan for the first time, you need to download and install the TWAIN service so Artisan can detect your scanner.
Click on Scan Document to start the process.

You will see this window pop-up on your screen. Click Download.

Open the downloaded file and follow the onscreen instructions to install the service. Once installed, refresh the page.
Scanning a Document

To scan a document, click Scan Document.

1. Select a scanner. All installed scanner will appear on this dropdown list. Select the scanner that you want to use. If your scanner is not on this list, please contact Artisan support.
2. Show Scanner UI. Some scanners have a built-in interface with special scanning options. Check this box to use that interface. Uncheck the box to immediately scan with default settings.
3. Scan. Click this button to start the scan.
4. Load. To upload a file from your computer, click the load button, and select your document.
5. Preview window. This is where the preview of your scanned document will appear.
6. Page List. All of your scanned documents will appear in a list of thumbnails in this panel. To see a particular page closer, click on the thumbnail and it will open up in the preview window.

1. Document Name: Use this field to label your document. This name is very important as it will be the main method of identifying what the document is.
2. Patient name: This information will auto-populate on the field
3. Document Type: Select the category of the document. You can choose from Lab, Imaging, Records Financials, and Consents.
4. Date Created: It will default to today's date.
5. Folder Name: Select the name of the created folder from the dropdown icon.
6. Once you finish adding the document information, click Save.
Viewing Scanned Documents
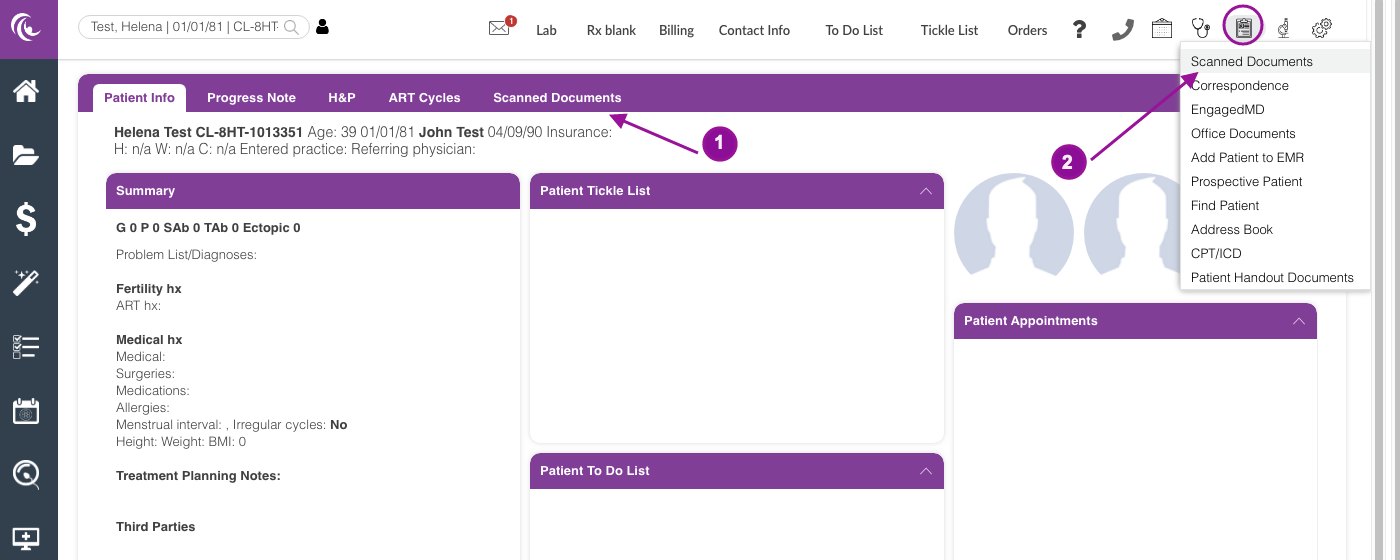
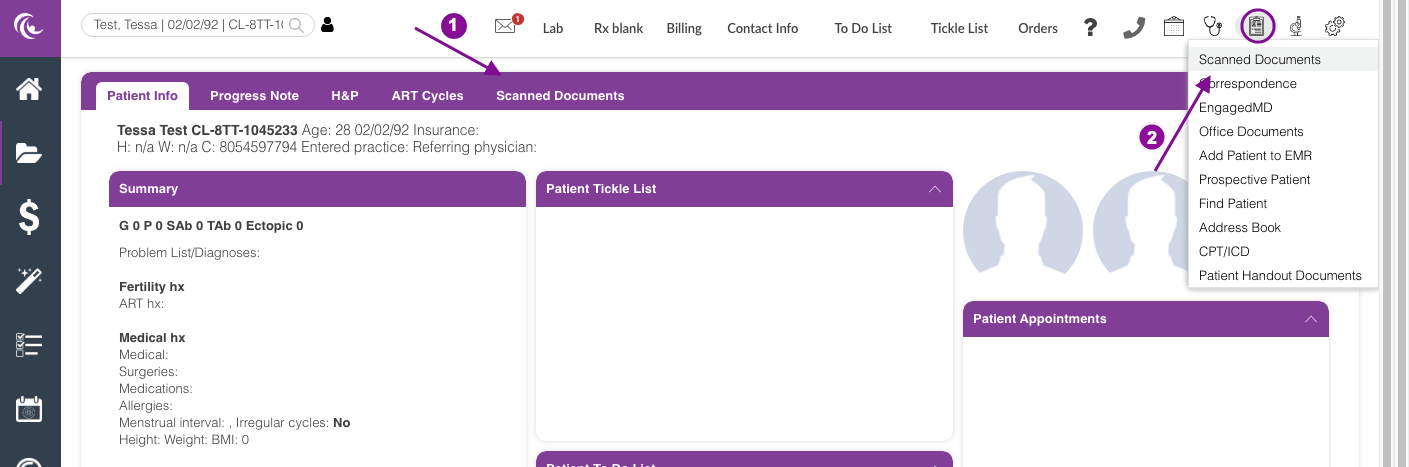
1. For Administrative and Clinic Admin user: From within the patient's chart click on the Scanned documents tab.
2. For Clinical and Practitioner users: View a patient's documents by going to the Admin Tools icon. Click Scanned Documents:
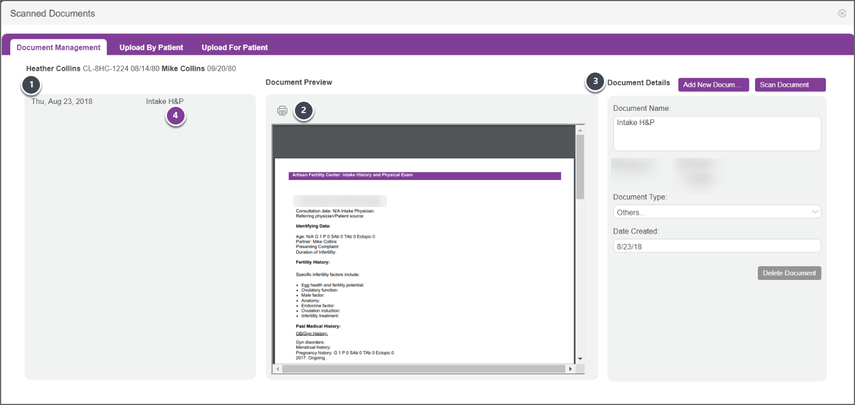
There are three components to the Documents Management interface:
List of Patient Documents [1]: This portal lists all of the patient's uploaded documents. Click on the Date or Document name [4] to make a document active.
Document Viewer [2]: The Document Viewer displays the scanned image. Scroll up and down the Viewer to see the complete document.
Document Information [3]: Input information regarding the Document Name, Type, and Date Created.
**All manuals are compliant with HIPPA regulations. No patient information has been released. All screenshots above were taken from a test clinic with fake patient information.
Artisan Support
Comments