Lab Notes has a graphical interface that allows you to enter oocyte/embryo data from a pop-up menu.
Below are the steps on how to enter fresh oocytes from an egg retrieval into the Notes.
This method applies to both IVF and Donor Banking Cycle types. There are separate tools for Donor Banking, which allow for the Allocation of Donor Eggs. This is reviewed in a separate article.
New Cycle Entry
When entering egg retrieval information for a new cycle, Lab Notes will appear blank. First, from Lab Notes select the Egg Retrieval tab to set up the cycle.
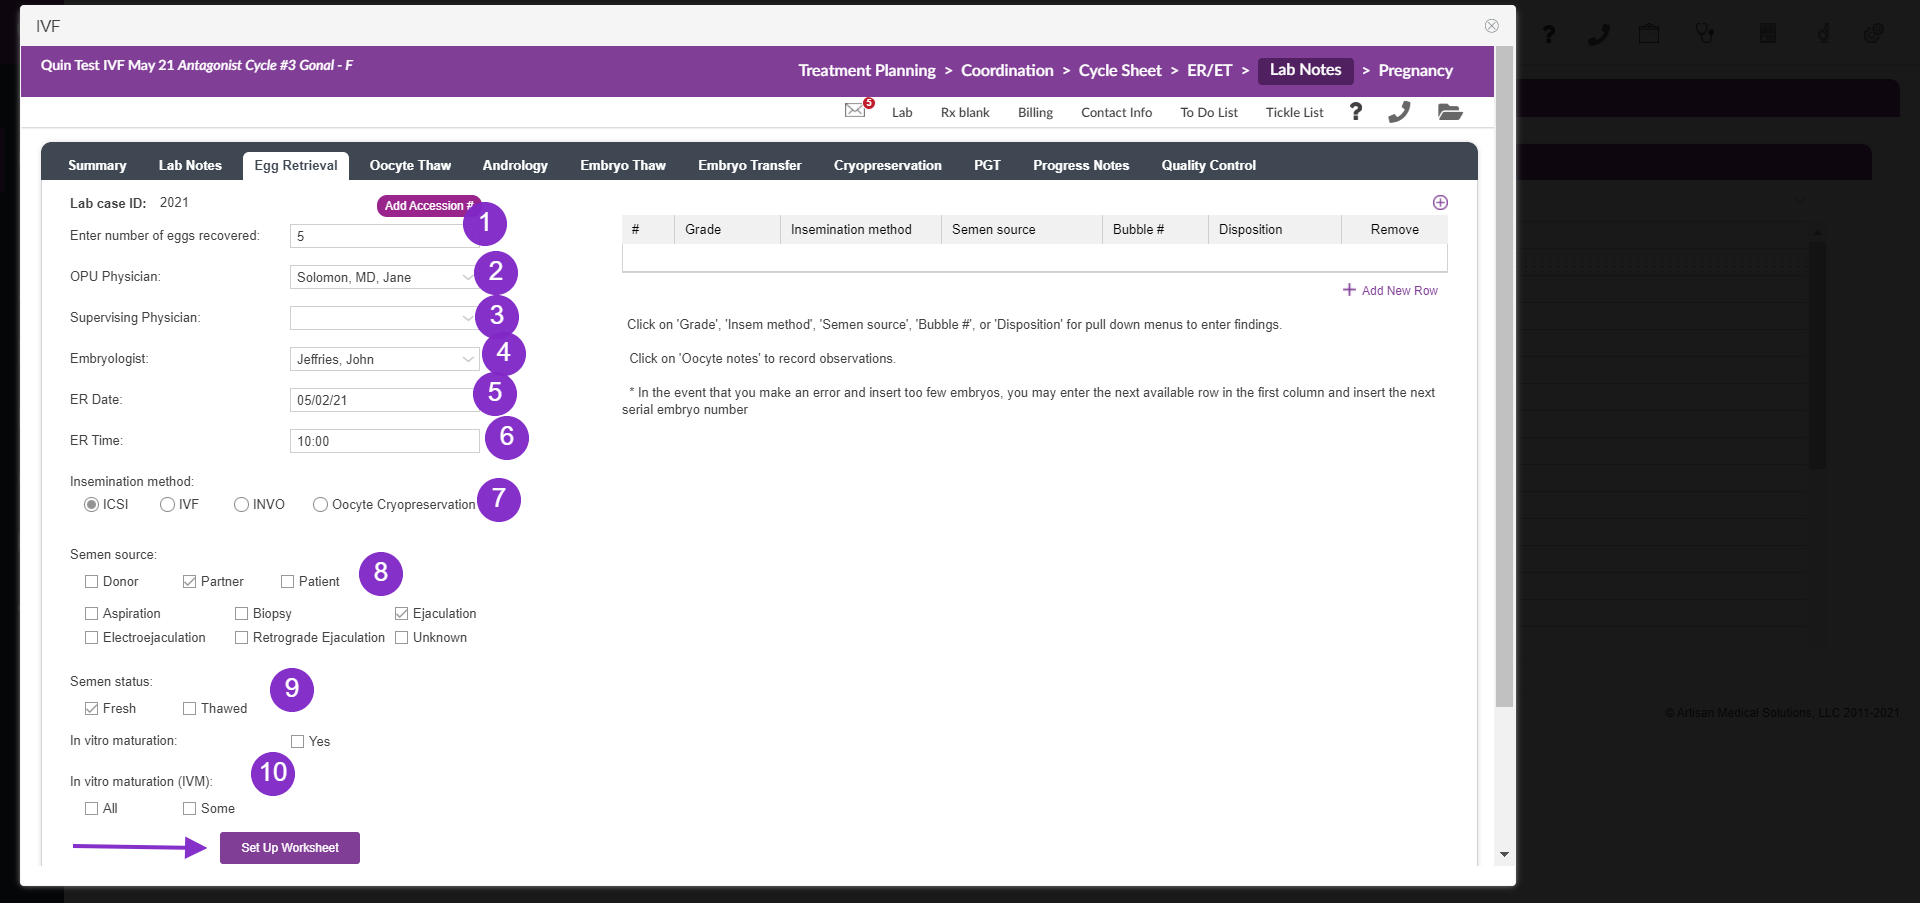
Egg Retrieval Tab
All tabs that allow you to bring biological material into the lab - Egg Retrieval, Oocyte Thaw, Embryo Thaw, Andrology - have an Add Accession # button. Accession numbers allow you to generate a unique number for each biological sample brought into the lab.
For more information please see the manual- How to Log a New Accession Number
Enter the following required information to enter the oocytes in the record:
- The number of eggs recovered.
- Select OPU Physician from the drop down options.
- Select Supervising Physician from the drop down options.
- Select the Gametologist/Embryologist from the drop down options.
- Your ER Date will auto-populate.
- Enter your ER Time as HH:MM.
- Select your Insemination method (if you are using more than one, select the method you plan to use most, if you select ICSI, you will be asked the SART indication).
- Select Semen source: (if you are using more than one, select the method you plan to use most) and then select the method of semen collection.
- Mark status as either Fresh or Thawed.
- When applicable, fill in the In vitro maturation selections.
Then click Set Up Worksheet.
This will create one record in the database for each oocyte. As a convenience the insemination method and semen source are auto-entered.
You are also able to add another line item to the worksheet that has already been set up. Select the + Add New Row to manually add another row to the worksheet then proceed to grading.
To Delete a row, click on the the check box under the Remove column at the right. It will ask you if you are sure. This ability will no longer be available after 72 hours and you must contact support to have it removed.

Once you have set up the worksheet you are able to grade the eggs, either via the Bulk Grading Method or Individually.
Bulk Grading Method
For Bulk Grading, select the purple + to enter grading for the egg retrieval. The grading system you have programmed in (Embryo Grading) will appear. This will allow you to appropriately grade each sample. In order to make this process faster we built in a series of tools to accommodate bulk grading. To grade multiple samples at a time see below.

Bulk Grading Steps
There are 5 steps for bulk grading:
- Select the oocytes/embryos to apply the grading to (in this case we are grading oocytes 1,2 and 3). You may also add other selections by clicking the circled plus signs. The left side allows a range of oocytes/embryos to be selected (ex: 1-3) , the right side allows a group of separate oocytes/embryos to be selected (ex: 1, 3, 5).
- Click the arrow button to make the selection
- If using Drop number, assign here and then Grade. You may modify the information about the Insemination method, Semen source, and Disposition using the radio buttons at the foot of the window.
- Select the insemination tech from the drop-down. All lab staff will pull in this drop-down.
- Click Commit to Save your work.

Reset Button
This option is available for bulk grading. “Reset” allows you to reset the previous selections in bulk without clinking individually into each cell. The reset feature is available on all lab days under Lab Notes.
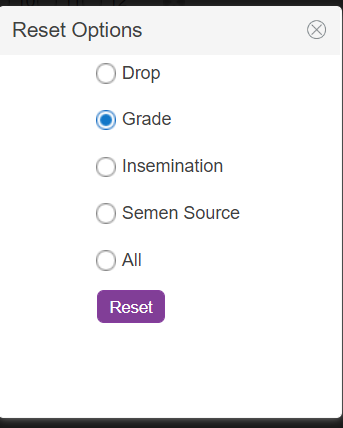
Once you select reset a display window will pop up providing you with reset options. Select what options you need to reset for that day and select reset. To reset all information select "All" then reset. All information will reset and allow you to make new selections.
Once cryo is selected this option will not be able to reset. Cryo is the only disposition that will not be able to reset from this feature. You are still able to unselect cryo by clicking on the grey (x) in individual and bulk grading.
Oocyte Cryo
Oocyte cryo is used to cryo oocytes in the bulk grading. When selected the oocytes will now display under the oocyte thaw tab. To undo the selection click on the grey (x) next to the selection to clear the radio button. Use the drop-down to indicate the lab staff that performed the cryo.
Previously graded oocytes/embryos are indicated by the lighter color purple see at the arrow above. Oocytes/Embryos selected for current grading appear in the darker color. Oocytes/Embryos without grades will appear in light grey.

Once all are graded upon retrieval, day by day grading will be completed in the Lab Notes tab.
Individual Grading Method
If you so choose, we have individual grading available as well, allowing you to grade each oocyte/embryo individually.
Rather than clicking the purple plus sign for bulk grading, click into the line where you see the purple arrow to begin individual grading.

Created Record
Through either the bulk or individual grading method, you will now have a worksheet and Lab Notes from which to work for the remainder of the cycle.
*All manuals are compliant with HIPPA regulations. No patient information has been released. All screenshots above were taken from a test clinic with fake patient information.
Artisan Support
Comments