The Office Info section stores all of your practice location and tax information. This information is used in many areas of the system such as handouts, claims and reports.
Navigation
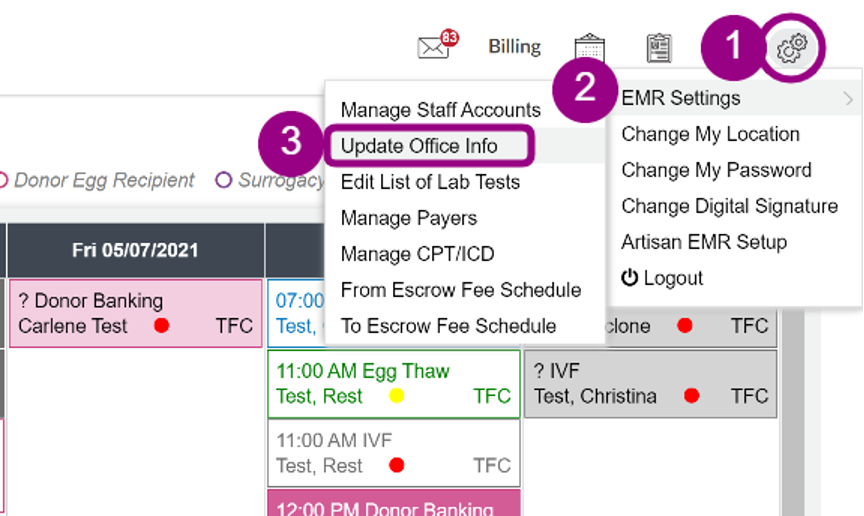
1. Go to the Gear icon in the upper right corner.
2. Use the pull down menu to select EMR Settings
3. Choose Update Office Info
Set Up Office Location-Office Info Tab
Part of your system setup will be to add your locations and office information. As your practice grows and adds new locations, or moves, you may add additional addresses here.
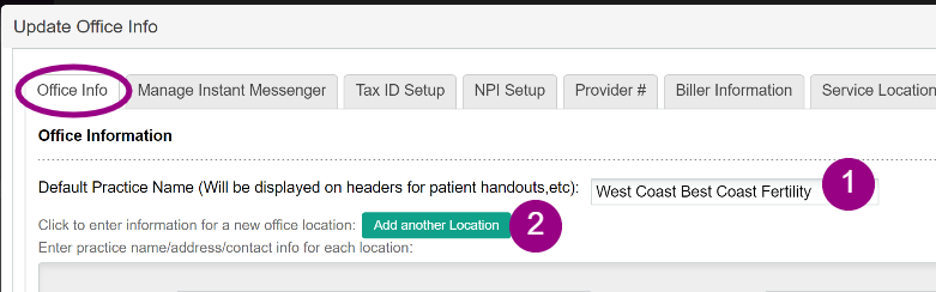
1. Enter your center's "Default Practice Name". This name will be displayed on treatment calendars, handouts, etc.
2. To add an office address click Add Another Location.
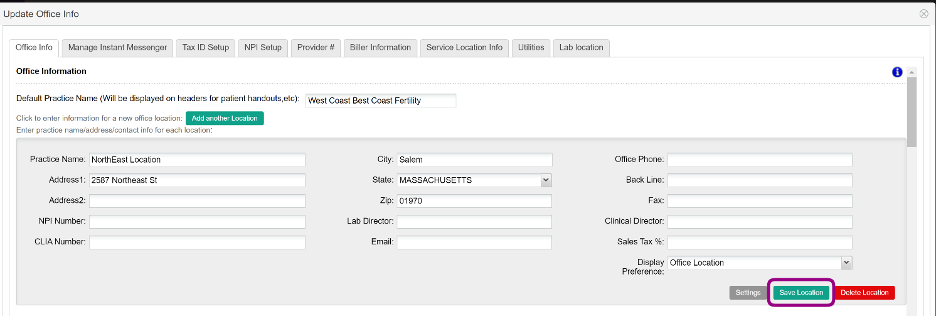
Fill in the office name, address, and phone/fax numbers. This information will be displayed on reports, prescriptions, etc.
Click Save Location to save the information
Add as many addresses as is appropriate for your practice.
Manage Instant Messenger Tab
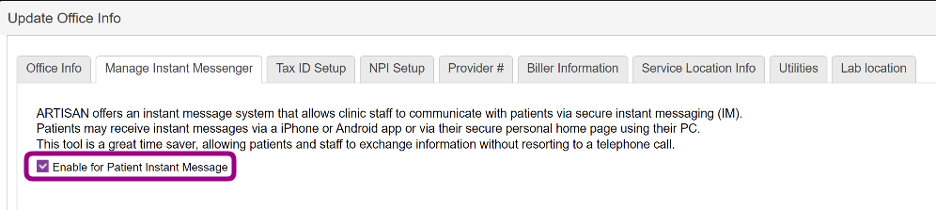
If your practice will be taking advantage of the instant message system within Artisan, you will need to make sure that the Enable for Patient Instant Message checkbox is marked.
If you will not be using the instant message feature, please make sure this box is unchecked.
Tax ID Setup Tab
Introduction
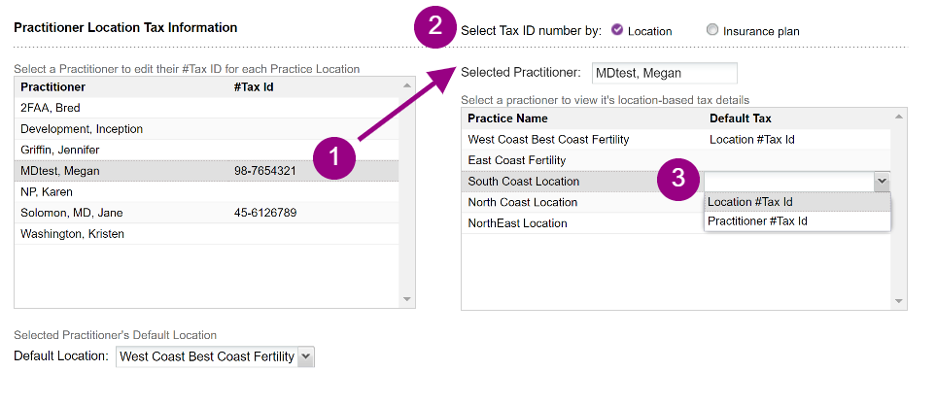
The Insurance Tax Info tab holds all of your location a practitioner tax ID information. On this screen you can set a default location for each Practitioner as well as select whether to use the location or practitioner ID for each location. This tax information is used when submitting claims through Change Healthcare.
Enter Tax ID Information for Practice Locations and Practitioners
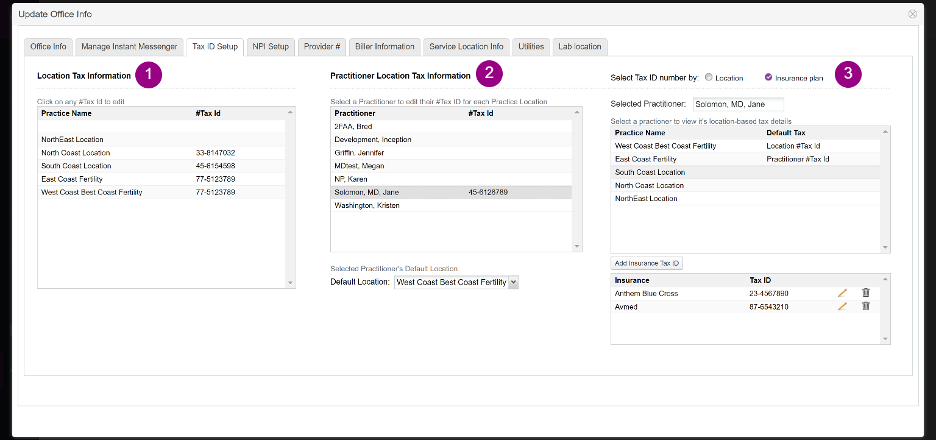
1. Location Tax Information: This lists all of the locations stored in Office Info and their associated tax ID numbers.
2. Practitioner Location Tax Information: This lists all of the users with the role of Practitioner in the system.
3. Default Tax: This shows the selection of tax ID by location for the selected practitioner.
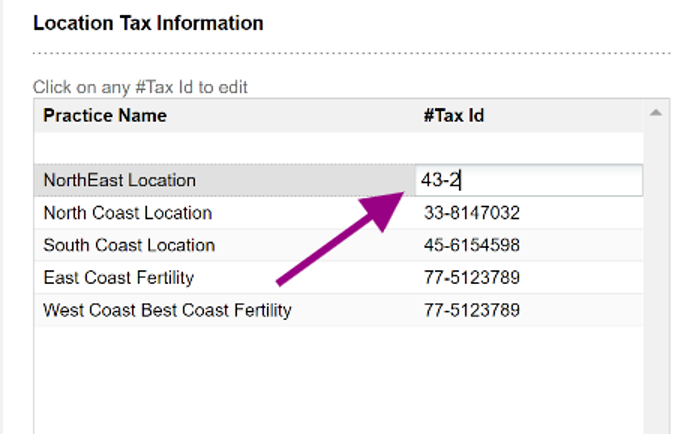
To add the location's tax ID, click on row you want to edit and enter in the ID.
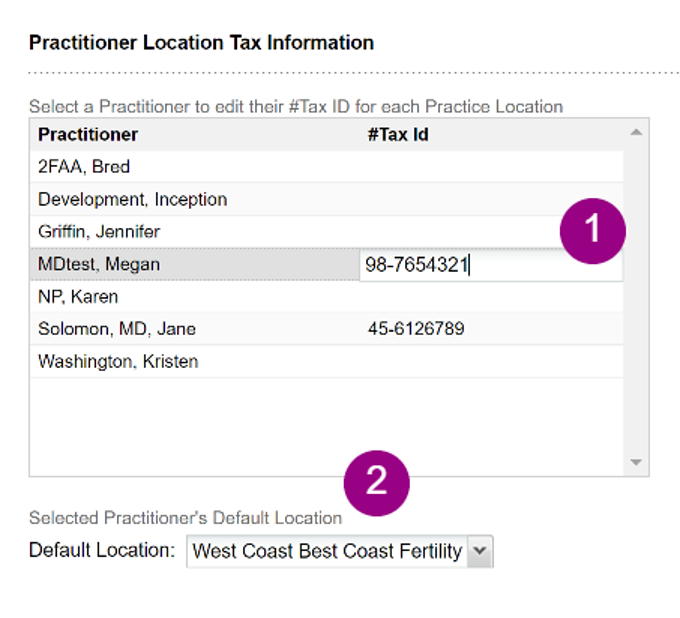
1. To add the practitioner's tax ID, click on row you want to edit and enter in the ID.
2. Once you select a practitioner row, you can set the practitioner's default location.

- To add the practitioner's tax ID, click on row you want to edit and enter in the ID.
- Select the Tax ID number by either Location or Insurance Plan. If you have to bill under a specific Tax ID number for a certain insurance, select the insurance plan radio button.
- Once you have selected a practitioner, you will be able to choose between using the Location Tax ID and Practitioner.
To Bill a Specific Tax ID for a Certain Insurance
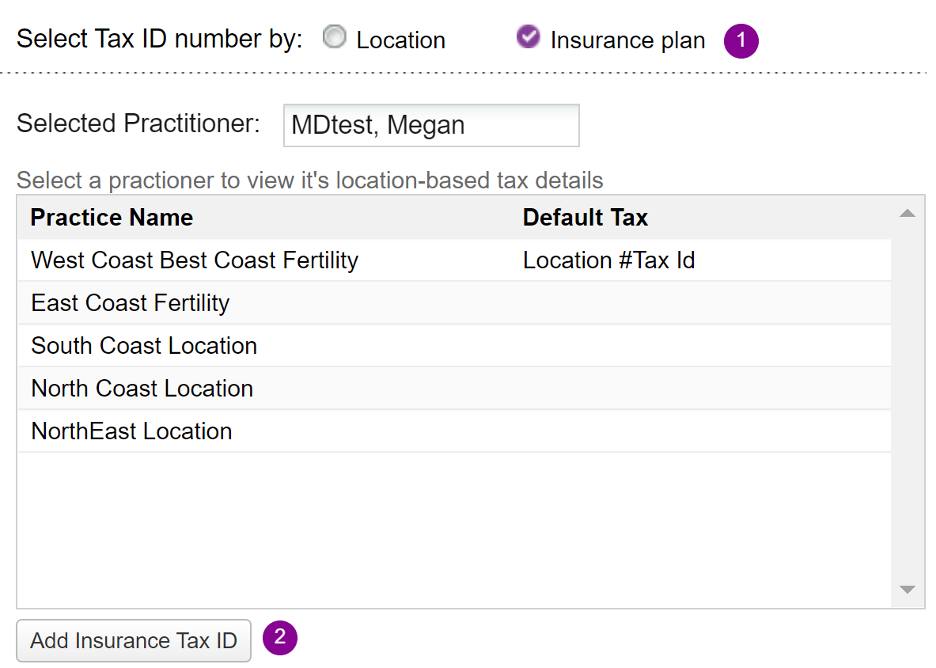
- Select the Insurance Plan radio key.
- Click on Add Insurance Tax ID. The following box will appear.
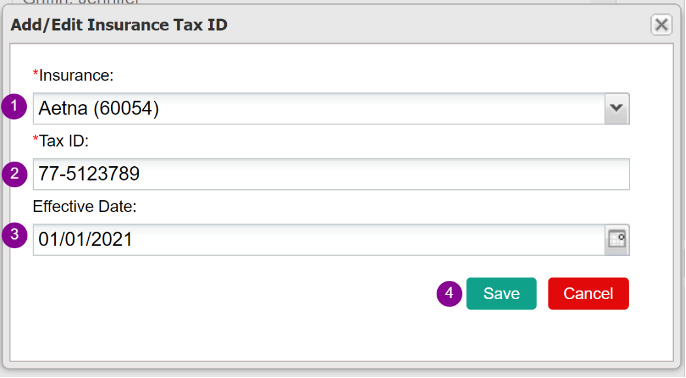
- Select the insurance plan from the dropdown box.
- Enter the Tax ID that you will be using specifically for this insurance.
- Enter the Effective Date of when you want this change to take effect.
- Click Save.
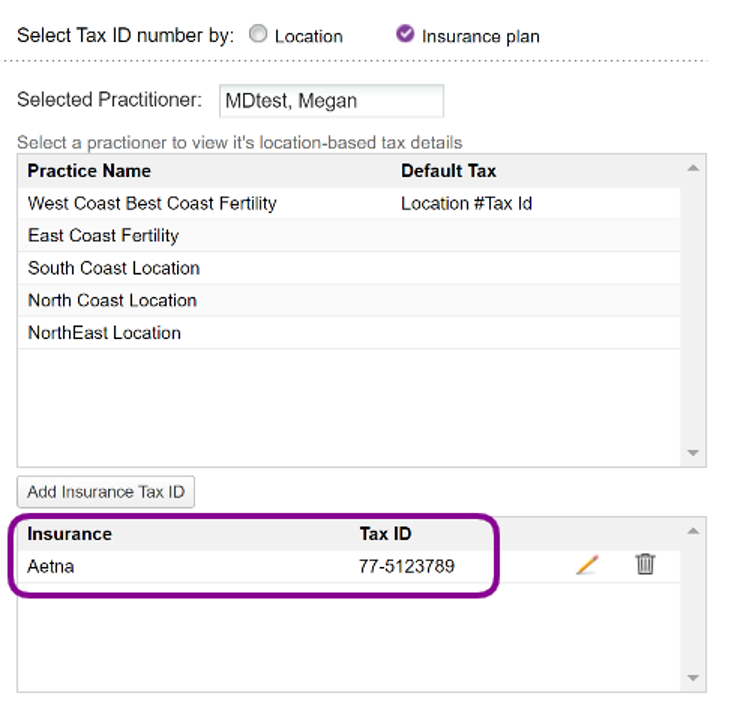
The insurance has now been added to the list under the practitioner.
NPI Setup Tab
Introduction
The NPI Setup tab holds all of your location a practitioner NPI information. On this screen you can set a default location for each Practitioner as well as select whether to use the location or practitioner ID for each location. This information is used when submitting claims through Change Healthcare.
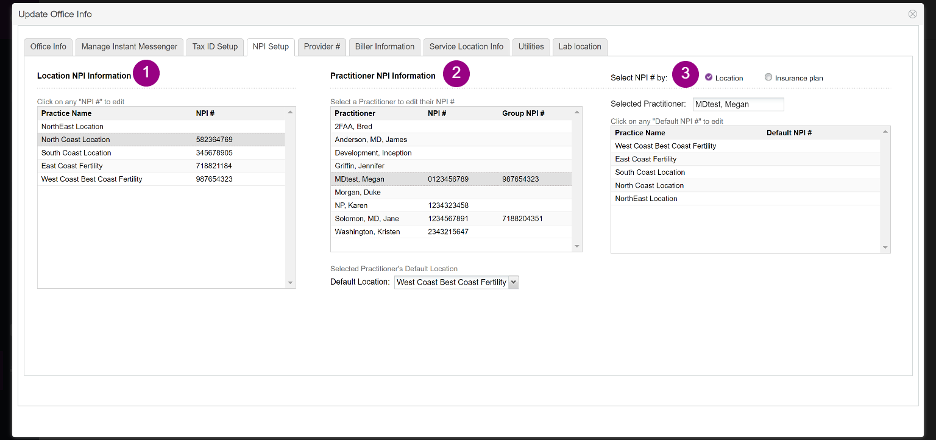
1. Location NPI Information: This lists all of the locations stored in Office Info and their associated NPI numbers.
2. Practitioner NPI Information: This lists all of the users with the role of Practitioner in the system.
3. Default NPI#: This shows the selection of NPI# by location for the selected practitioner.
To add the location's NPI, click on row you want to edit and enter it under the NPI# column.
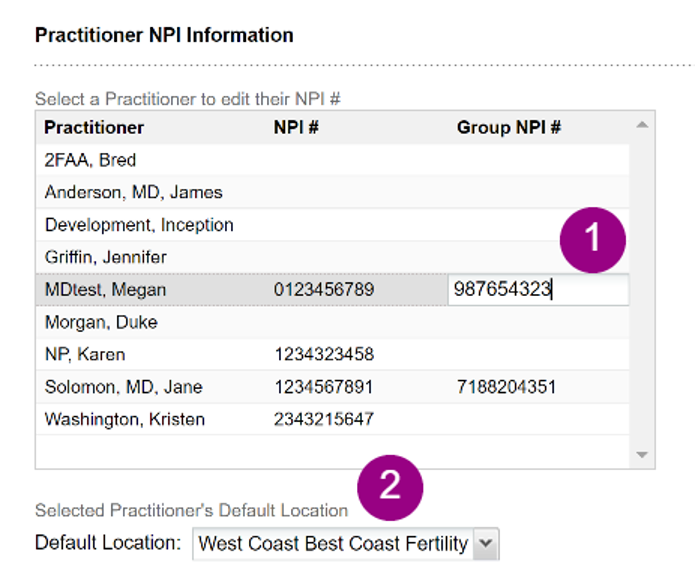
- To add the practitioner and group NPI numbers, click on row you want to edit and enter it under each column.
- Once you select a practitioner row, you can set the practitioner's default location.
- To add the practitioner's NPI, click on row you want to edit and enter in the practitioner and group NPI numbers .
- Select the NPI by either Location or Insurance Plan. If you have to bill under a specific NPI number for a certain insurance, select the insurance plan radio button.
- Once you select a practitioner row, you can set the practitioner's default location.
To Bill a Specific NPI for a Certain Insurance
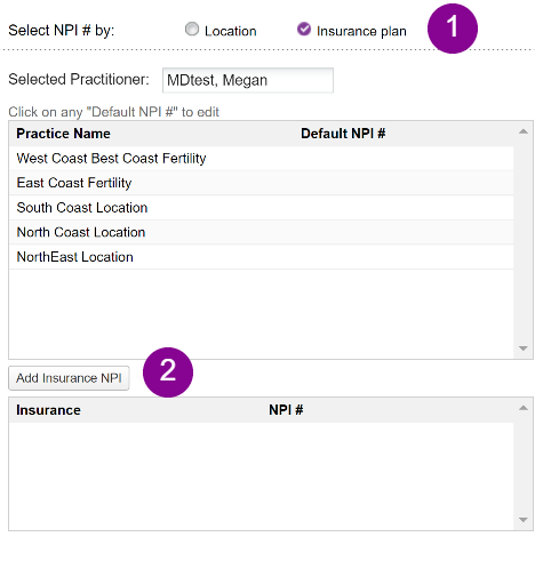
- Select the Insurance Plan radio key.
- Click on Add Insurance NPI. The following box will appear.
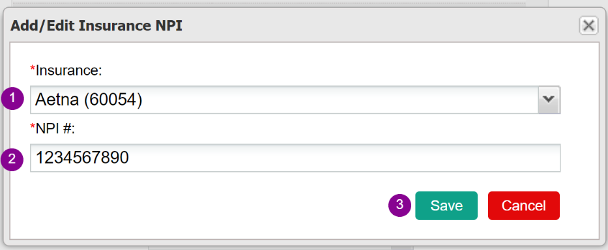
- Select the insurance plan from the dropdown box.
- Enter the NPI that you will be using specifically for this insurance.
- Click Save.
Biller Information Tab
This tab stores all of the biller information for use with the Change Healthcare integration. This is not necessary to fill out in all cases.

Every location has a slot to enter in the main biller for the location. This contact information will be used if the clearing house or payer needs to contact the biller directly with an issue.
Service Location Info Tab
The Service Location Info tab stores the all of the location information for the places outside of your practice that a patient may be seen.
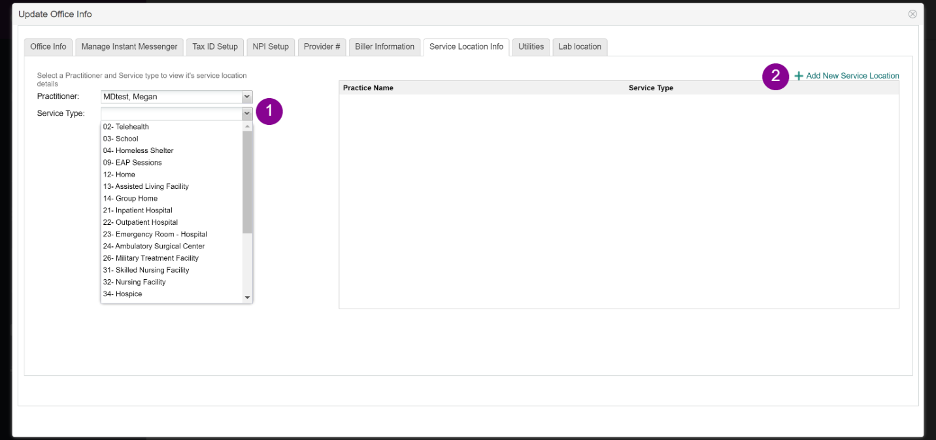
- Select a practitioner. After a practitioner is selected, all of the locations for that practitioner will display on the right. To filter down further, select a Service Type to see the locations of that service type.
- To add a new location, click Add New Service Location.
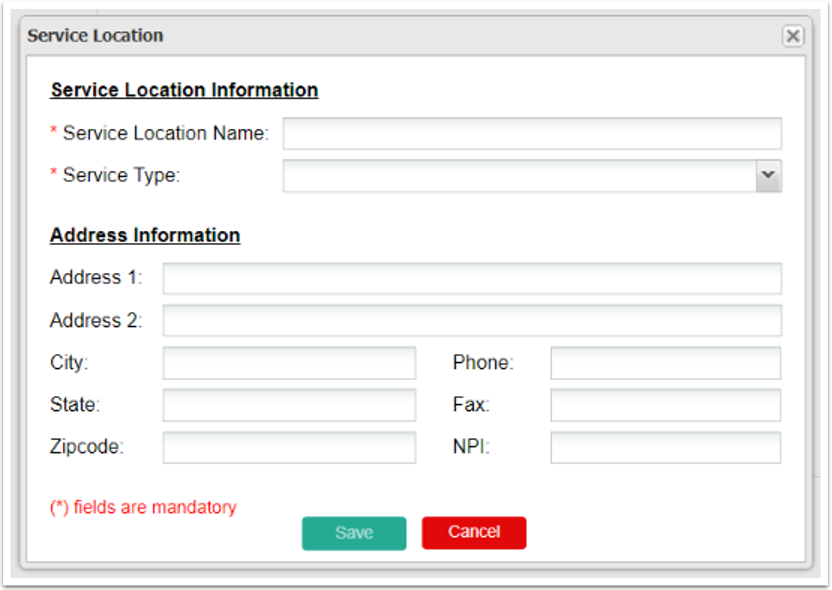
After clicking Add New Service Location, fill in the service location's name and service type. The address information is also important if using this location in uploaded claims. Click Save to save the location.
Utilities Tab

On this tab you are able to establish the maximum FSH level in the lab and choose the default language of Artisan. Any changes here will automatically be saved.
Lab Location Tab
If you have more than one lab location, you will want to enter each location into the system for billing purposes. If you just have one lab location, you will not have to complete this area.

Click Add Another Location.
Enter the lab name and location details and click Save Location.
**All manuals are compliant with HIPPA regulations. No patient information has been released. All screenshots above were taken from a test clinic with fake patient information.
Artisan Support
Comments