ART Schedule tools are designed to provide you with complete information concerning patients under active treatment with ART or OI/IUI. Patient information is presented at both a macro level – monthly schedule for egg retrieval/embryo transfer and IUI – and at a micro level, displaying the day's treatment calendar instruction for each patient under treatment in the clinic. This is the area of Artisan that helps to connect both the clinical and lab teams together in patient care.
Navigation

From the home page, select the ART Schedule tab to launch these tools.
ART Schedule Tools

ART Schedule Tools present patient information via six different displays (all data-driven that update as changes occur in the system in real-time):
1. Surgical Grid: This is a calendar view of all patients in an ART cycle displaying all transfer, retrieval, and surgical information. The tiles presented are clickable and will bring the user directly to the patient's cycle.
2. ER/ET Schedule: This is a list of all patients in cycle displaying ER (retrievals) and ET (transfers). It displays the patient name, cycle type, donor name (if applicable), and projected/confirmed dates for egg retrieval and embryo transfer. The names are clickable and will bring the user directly to the patient's cycle. This will also show which cycles have been reported to SART at cycle start through Artisan.
3. Lab Schedule: A list of all patients with samples present in the lab, or in culture, is presented here. This is a great synopsis of what is "happening" in the lab each day. This section allows the user to click through directly to the patient's Lab Notes and is designed specifically for the embryology team.
4. Change Orders: From the Cycle Summary page, which funnels directly from the IVF Lab Referral, the clinical team may submit change orders to a given cycle plan. It is here that the IVF lab is notified of all changes and may digitally sign off on the changes.
5. FET: This is a list of the frozen embryo transfer schedule for a given month. The names are clickable and will bring the user directly to the patient's cycle.
6. Third Party Parenting: This is a list of all third-party parenting cycles in a given month. The names are clickable and will bring the user directly to the patient's cycle.
7. IUI Schedule: This is a list of all patients having treatment with ovulation induction or ovulation induction and insemination. Cycles are listed in order of anticipated ovulation/IUI date. The names are clickable and will bring the user directly to the patient's cycle.
8. ART Day Sheet: This is a list of patients and their cycle treatment notes (ultrasound examinations, hormonal testing, patient treatment instructions) for the selected day. The names are clickable and will bring the user directly to the patient's cycle.
Surgical Grid
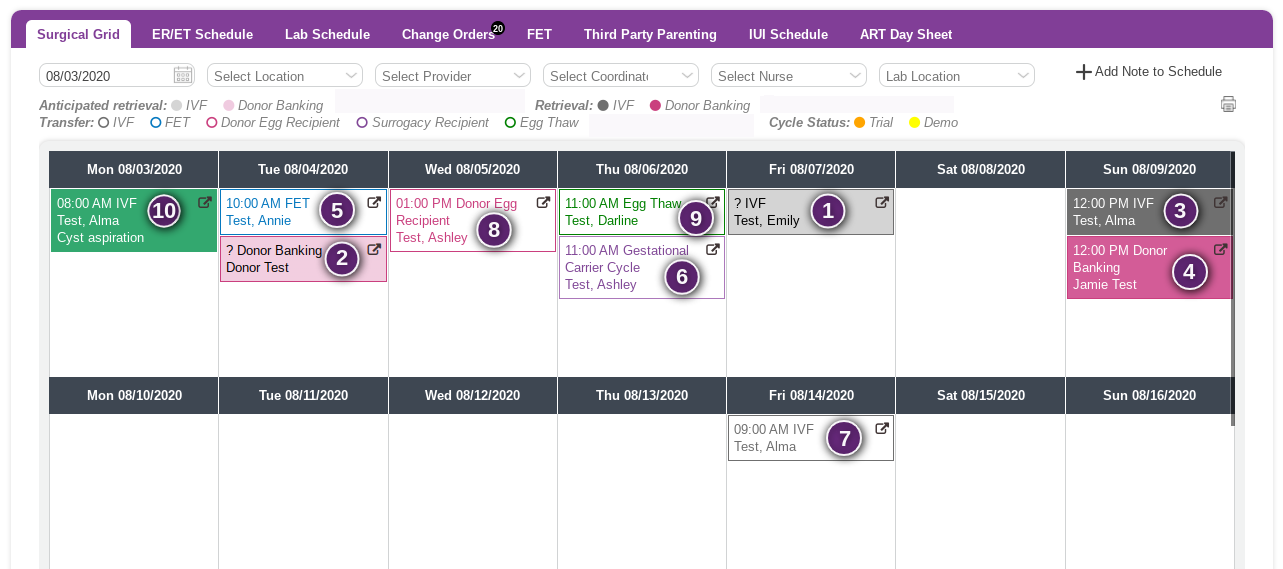
Surgical Grid: This is a calendar view of all patients in an ART cycle, displaying: anticipated retrievals for patients and donors, confirmed retrievals for patients and donors, all transfers and other surgical procedures. This display will change and update as other actions in the system occur (new cycles, triggers, patients are put on progesterone, etc.)
This calendar-view may be filtered by date, location, provider, coordinator, nurse or lab location.
The colors indicate the nature of the cycle and the status:
Anticipated Retrievals: These are patients and donors in cycle who have not yet been triggered (1. light grey represents patients, 2. light pink represents donors).
Retrievals: These are patients and donors in cycle who have been triggered with scheduled retrieval times and dates (3. dark grey represents patients, 4. dark pink represents donors).
Transfers: These are patients, donors and surrogates with scheduled embryo transfers (these will all appear in outline): 5. blue for FET, 6. purple for surrogacy, 7. grey for fresh IVF transfer, 8. pink for donor egg recipient, 9. green for an egg thaw with a transfer.
Other surgical procedures will appear in green (10). These are added directly from the Cycle Summary page by the clinical team in the Surgical Schedule section.
Cycles marked as Trial will have an orange dot inside the cell. Cycles marked as Demo will have a yellow dot inside the cell.

This is a live, data-driven display. Clicking any of the tiles, you will land on the respective cycle sheet for the patient.
Clicking on the 

You may also add a note to the Surgical Grid by clicking +Add Note to Schedule. This can be used for notes such as when a lab will be closed for cleaning.
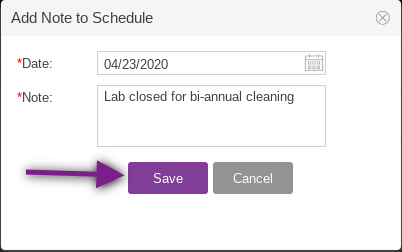
Fill in the required areas as indicated by the red asterisk and click Save.
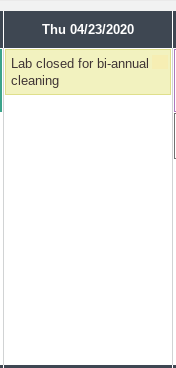
The note will appear on the schedule in a light tan color.
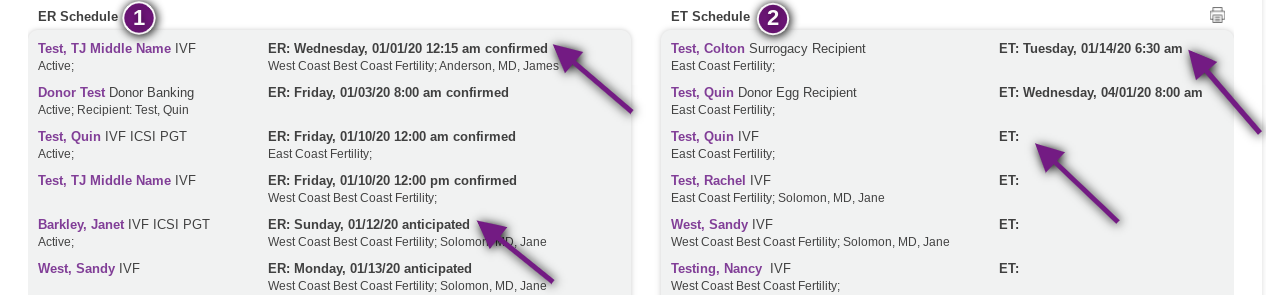
ER/ET Schedule


ER/ET Schedule provides a list-view schedule for upcoming egg retrievals and embryo transfers and a link to individual treatment calendars and cycle progress notes.
This view can be filtered by date, location, provider, coordinator, nurse or lab location. You may also click current cycles to remove any filters that have been applied.
1. To view a patient's Cycle Sheet, click on the Patient's Name that is highlighted in purple. Here you can open the cycle to record cycle progress notes, update the patient's treatment calendar or trigger the patient for hCG or lupron administration and egg retrieval as appropriate.
2. Patients that have been reported to SART at cycle start will have a small green dot next to their name.
-
ER Schedule: Next to the patient's name, the cycle type will be displayed. Under the name, the cycle will be labeled as Active, Trial or Demo if that was indicated on the cycle. Anticipated egg retrievals will have the date of the estimated retrieval with "Anticipated" next to it. Confirmed egg retrievals will have the the date and time of the retrieval with "Confirmed" next to it. Under the retrieval information will be the patient's location (if selected in Edit Contact Info) and the primary MD.
-
ET Schedule: Next to the patient name will be the cycle type. Under the name will be the patient's clinic location and primary MD. Scheduled embryo transfers will have the date and time of the transfer. Transfers that have not been scheduled will be blank next to ET.
Lab Schedule
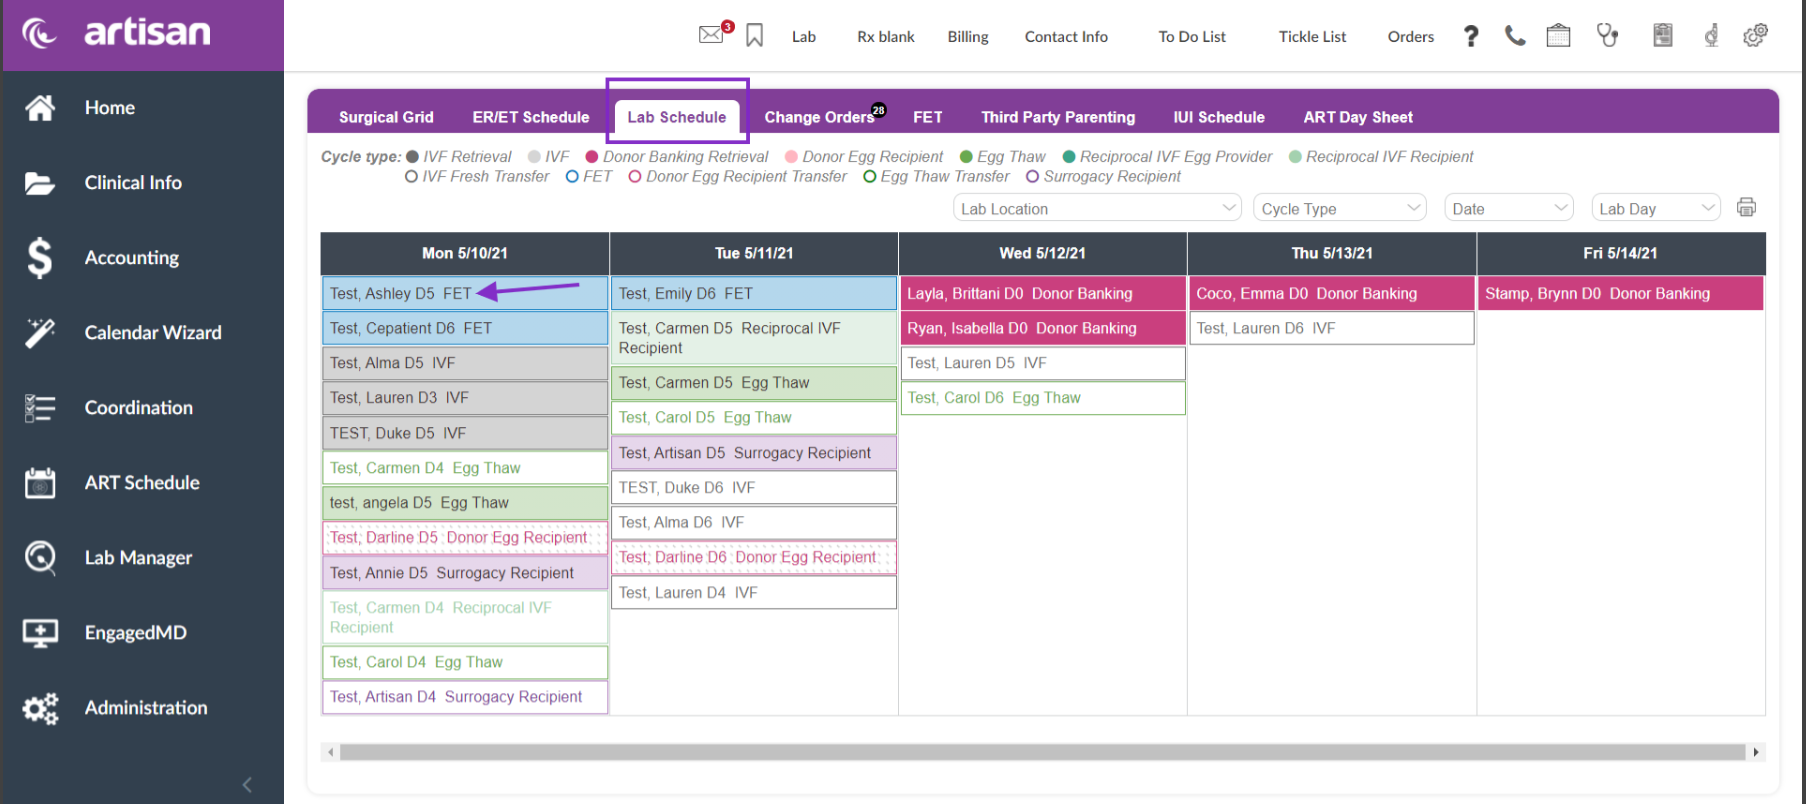
The Lab Schedule has been organized to show all of the Day 0 cycles at the top with transfers and embryo check days following.
The Lab Schedule displays all patients with samples present in the lab or in culture on a given day. This is a great synopsis of what is "happening" in the lab each day. This section allows the user to click through directly to the patient's Lab Notes and is designed specifically for the embryology team. To do so, simply click on the patients name.
At the top of the Lab Schedule, there is a color key indicating what each cycle type's color is. In each cell, the name of the patient, lab day number and cycle type will be displayed.
Cycles may also be filtered by lab location (if your practice has more than 1 lab), cycle type and date.
If for example, we thaw and then transfer a frozen embryo for Cindy Messenger on 10/18/2018 (D5) it will not appear on the following day. The tiles will auto-update based upon actions taken inside of the IVF lab.
Select on the check box to indicate the fert report for the day is complete.
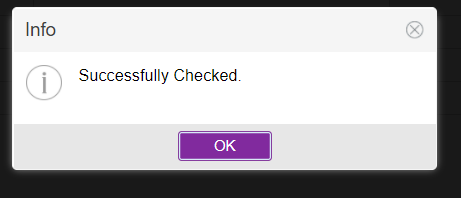
A verification window will display indicating the checkbox is successfully checked.
When a day is marked as complete in the lab a checkmark will display in the right-hand corner indicating this day is done.
From lab notes once you check
Change Orders

If there is a change to the plan of a cycle, the lab is notified here in the Change Orders tab. From this one location, all change orders may be reviewed and then digitally signed off or acknowledged by the lab staff. The Change Orders can be filtered by Lab Location. Each changed order will display the date it was created, the patient name, partner name and the text of the order. To digitally sign off on the orders, follow these steps:
1. Click the box next to the submitted change. You may check more than one box to acknowledge multiple Change Orders at once. To select all Change Orders, click the box at the top.
2. Click Acknowledge Digitally and then enter your digital signature when prompted.
Once the order has been acknowledged, a check mark will appear next to the order where the box previously was. The change order in the patient's cycle will show a name, date and time stamp of when the order was acknowledged by the lab.
The number next to the word "Change Orders" indicates the number of new changes that need to be digitally signed off. This updates in real-time.
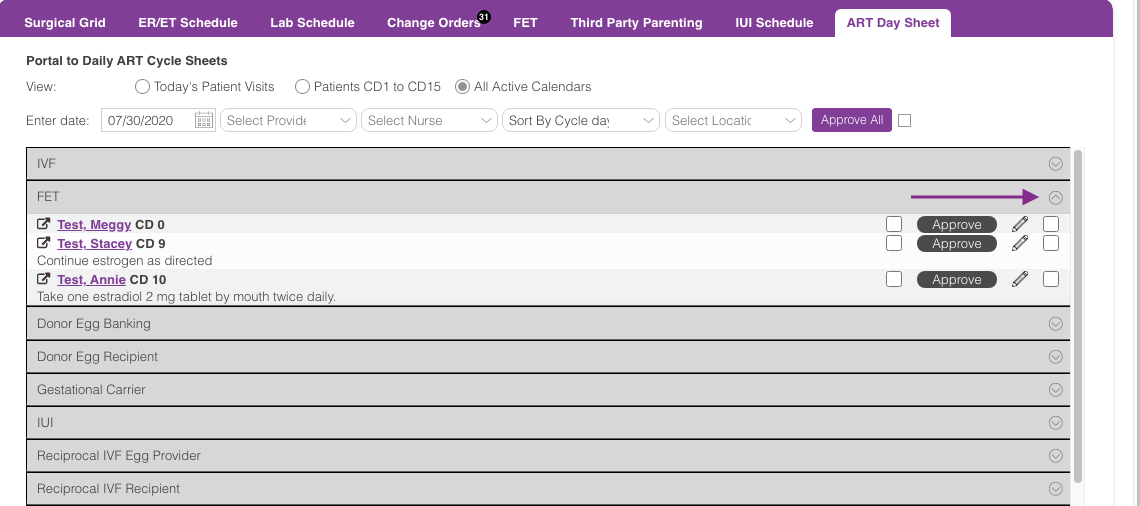
FET


FET provides a list-view schedule for frozen embryo transfers and a link to individual treatment calendars and cycle progress notes.
This view can be filtered by date, location, provider or lab location. Click Current Cycles to remove any filtering and view all current cycles.
1. To view a patient's Cycle Sheet, click on the Patient's Name that is highlighted in purple. Here you can record cycle progress notes, update the patient's treatment calendar or mark the progesterone start date.
2. Patients that have been reported to SART at cycle start will have a small green dot next to their name.
Each patient name will have the cycle type next to it. Underneath the patient name, the patient's primary location and doctor will be listed.
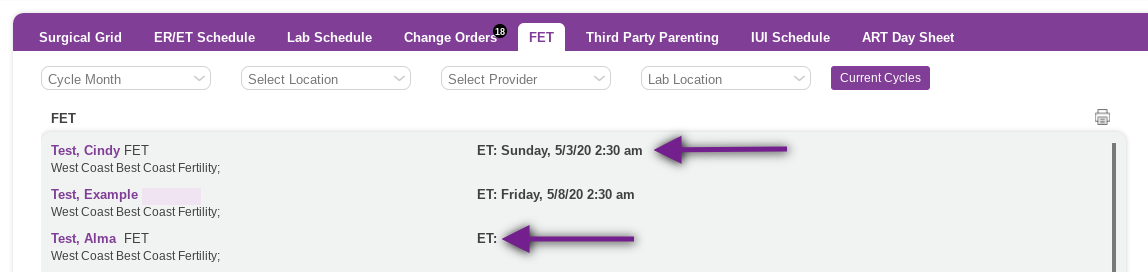
Scheduled FETs will have a date and time. FETs that have not been scheduled that will be blank.
Third Party Parenting

The Third Party Parenting tab lists any third party parenting cycles in a given month. This includes Surrogacy Recipient, Donor Egg Recipient and Donor Banking cycles. This list can be filtered by month, location and provider. Click Current Cycles to see the current month's cycles.
1. By clicking on the Patient's Name highlighted in purple, you may open the Cycle Sheet. Here you can record cycle progress notes, update the patient's treatment calendar or trigger the patient for hCG/Lupron administration and egg retrieval as appropriate.
2. Patients that have been reported to SART at cycle start will have a small green dot next to their name.
The anticipated/confirmed retrievals use the same logic that the ER/ET tab does. Confirmed retrievals will have a time and date with Confirmed next to it. Anticipated retrievals will have the anticipated date or retrieval with Anticipated next to it.
IUI Schedule
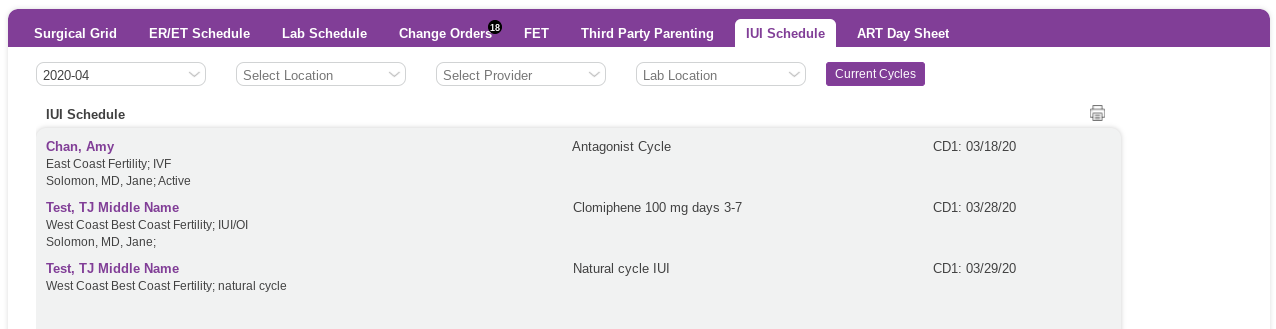
The IUI schedule tab provides a list of upcoming OI/IUI patients in treatment cycles for a given month. This list can be sorted by month, location, provider and lab location. Click Current Cycles to see the current month's OI/IUI cycles.
Patient records are sorted by Cycle Day 1 date. To view a patient's Cycle Sheet, click on Patient's name to open their Cycle Sheet. Use this window to manage their cycle progress notes, update the patient's treatment calendar and set up their insemination and luteal phase calendar.
In the first column will be the patient's name, primary location, cycle type and primary MD. The second column will house the protocol being used for the patient's treatment. The third column will show the patient's cycle day 1.
ART Day Sheet


The ART Day Sheet presents a portal of the patients currently in cycle in the practice. It allows the staff to sort the view of the cycles in 3 different ways:
1. Today's patient visits: This will list all of the patients seen for the current day that are in a cycle.
2. Patients CD1 to CD 15: Lists patients that are currently in a cycle between cycle days 1 and 15 in the practice.
3. All active calendars: Any patient that currently has an active cycle open in the practice.
In addition to the different views, the cycles can be sorted by date, provider, coordinator, nurse, the option to sort by cycle day 1 or name and location. This presents the information from each monitoring of the day, with follicle counts and measurements, hormone levels, the current days medication dose, the current day's patient instruction and allows for staff to enter blood work results. This also allows the physician to see all patients in a cycle according to the view selected in one place.
This is a great way to view all of the patients that had monitoring for the day. The provider can review the patient's treatment cycles and input their dosing/triggering orders for each patient.

The practitioner is able to input the patient's dosing/triggering orders, complete the plan and impression and "Approve" the changes. To do so, click the pencil icon to Edit.

"Save" will save the changes but will not produce a practitioner's date and time stamp. This can be useful for staff entering blood work results on the ART Day Sheet. The practitioner will make the applicable changes and click Approve. This will prompt the practitioner to put in the digital signature.

When a change is made and approved, the practitioner's date and time stamp will appear next to the cycle. The changes made to the patient's cycle will appear to the left. Only practitioners have the option to click "Approve" for any changes made.
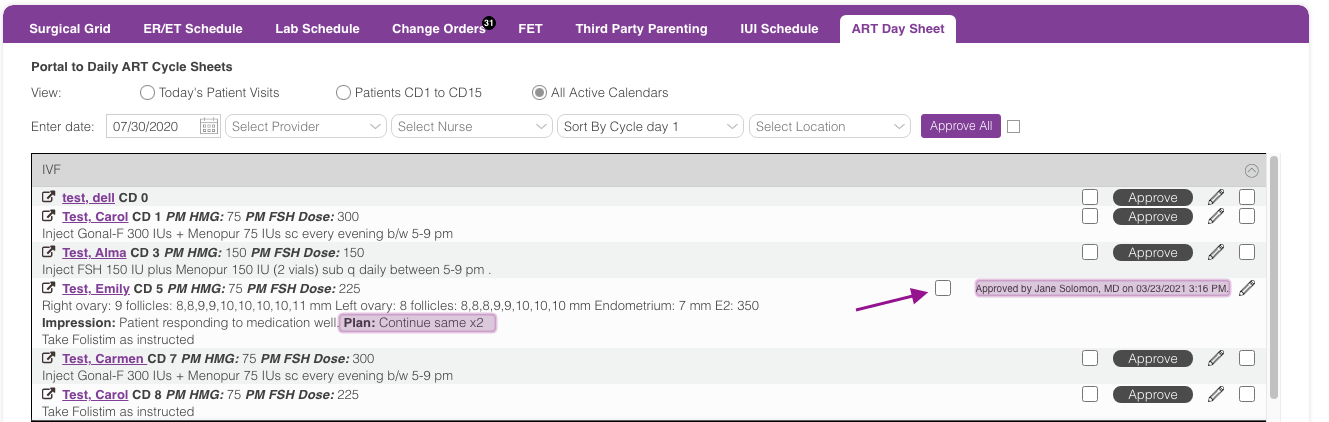
Once approved by the practitioner, the clinical team can sign off on the cycle by clicking the nursing task box.
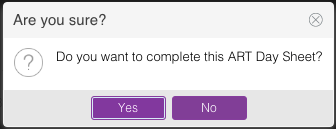
Click Yes to Proceed.
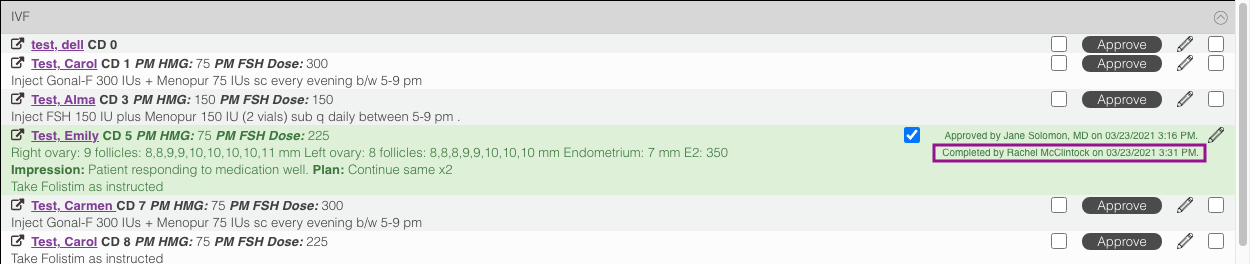
When the nursing task is complete, it will be highlighted in green. The staff's name, date, and time stamp will appear under the practitioner's signature.
In the case that a practitioner user type is needing to also approve of the nursing task, this can be enabled in EMR Settings.
To enable this feature:
1. Navigate to System Settings (two gear icon)
2. Click on EMR settings
3. Click on Manage Staff Accounts

While in Manage Staff Accounts, click the pencil icon next to the Practitioner you wish to enable this feature for.

You will see a box titled " ART Day Sheet nursing task access", ensure this is checked, and then click save.

The practitioner will now have the ability to approve the nursing task.
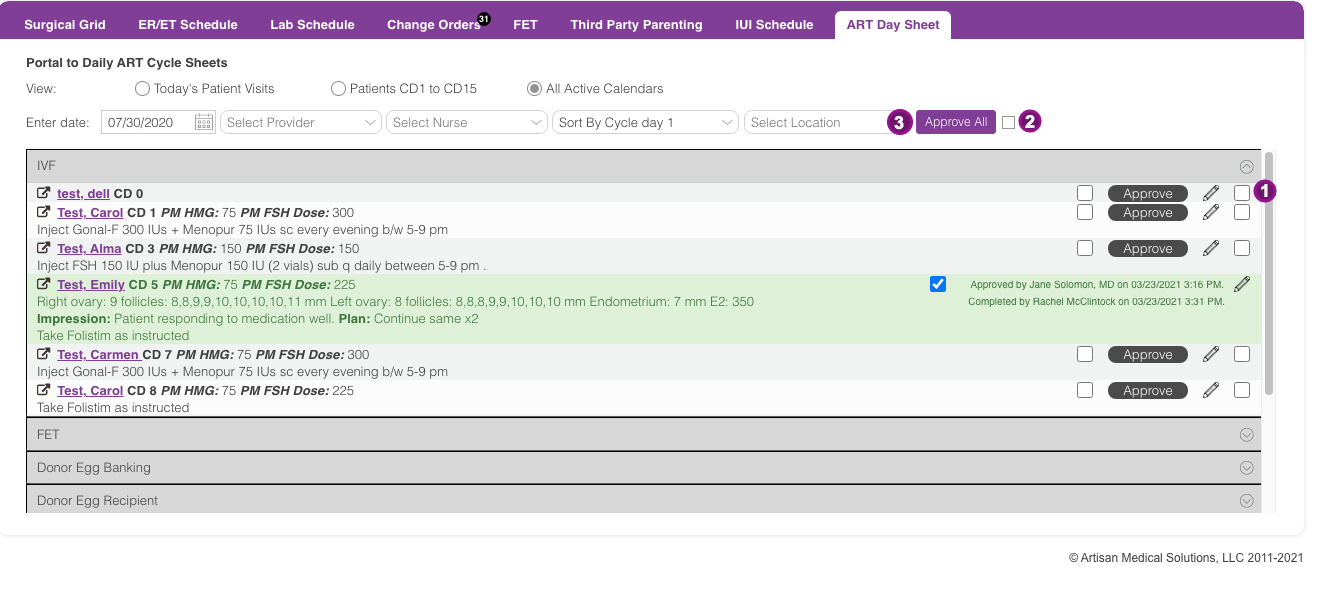
A practitioner may also use the bulk sign-off feature in the ART Day Sheet to sign off on multiple cycles at once within a cycle type.
- You may click in the box to the right of an individual cycle to select or deselect it for sign-off.
- The Check All box will select all of the cycles for sign-off in the expanded cycle type.
- Click Approve All to sign off on all of the cycles that are selected in the cycle type. You will be prompted for a digital signature.
The above steps would be repeated for each cycle type within the ART Day Sheet.
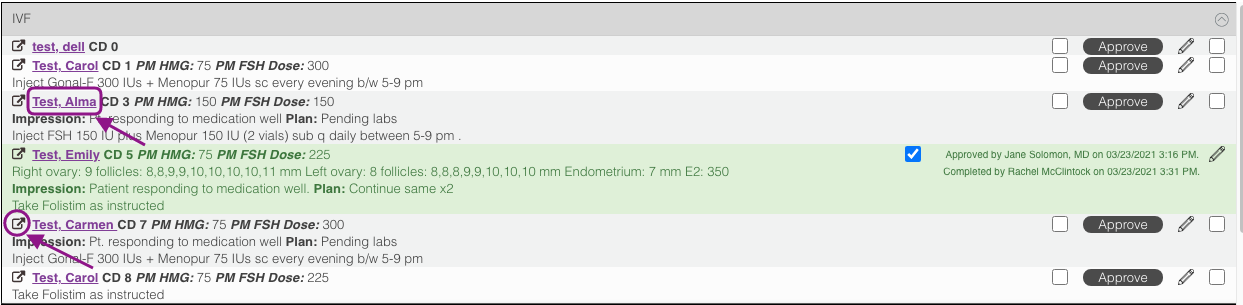
To view a patient's entire Cycle Sheet, click on the Patient's Name. To view the patient's chart click the box with the arrow icon.
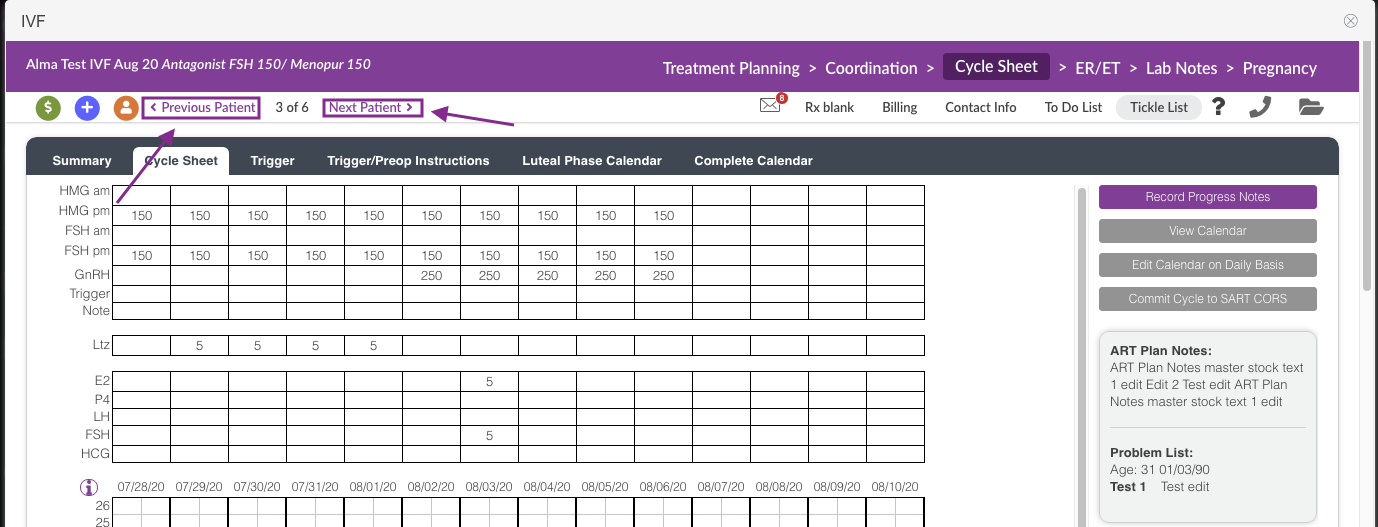
Clicking on the patient's name will open directly to the cycle sheet where the physician can view results and record an in-cycle progress note. The physician is also able to toggle between the charts of all of the patients in that cycle category. To do so, click Next Patient. This will bring you to the cycle sheet of the next patient. You may also toggle backward. To do so, click Previous Patient.

To view the patients in each cycle type, click the drop-down arrow to the right of the cycle type you wish to view. It will expand the list of patients for that cycle type and collapse the list of the cycle type that was previously being viewed.
**All manuals are compliant with HIPAA regulations. No patient information has been released. All screenshots above were taken from a test clinic with fake patient information.
Artisan Support
Comments